WordPress SEO for Beginners: From Zero Traffic to First Page

Did you know that the right SEO strategy can transform your WordPress site into a magnet for visitors and potential customers? Whether you’re a small business owner or just starting out, understanding SEO is like having a secret weapon for sending traffic to your website.
And don’t worry if tech isn’t your thing—this guide is made for SEO beginners like you.
From building a solid foundation to fine-tuning the technical details, we’ve got you covered. Ready to make your WordPress site stand out in search results? Let’s get your business noticed!
Your Ultimate WordPress SEO Guide for Beginners
In this guide, we’ll cover everything from building a strong SEO foundation to crafting content that meets search intent, optimizing on-page elements, and fine-tuning technical SEO aspects.
Simply put, search engine optimization is all about making your WordPress website more visible in search engine results. But how do you do it right? Well, here are the only seven steps you actually need to care about.
#1. Build Your WordPress Site’s SEO Strategy Foundation
Before diving into keywords and content, you need to get the technical basics right. These foundational elements directly impact how search engines crawl, index, and rank your site.
Choose Fast & Reliable Hosting
Your hosting provider is one of the main factors affecting whether your pages load quickly or slowly. Your hosting controls three critical things:
- Server response time—that’s the split second between when someone clicks your link and when your server starts sending them content.
- Server resources—the computing power and memory your site has to work with, like the difference between a budget laptop and a high-performance computer.
- Uptime—whether your site actually stays online or goes down at critical moments.
Good hosting means your pages load in under 2 seconds—Google’s threshold for good performance. It also keeps your site online when search engines come to crawl it. Both site speed and uptime directly impact your search rankings.
If your server is slow or goes down frequently, search engines may struggle to crawl your site effectively, which means your content won’t get indexed properly or rank as well as it should.
But site speed impacts SEO in multiple ways: slow-loading sites have higher bounce rates (users leave before the page loads), lower time-on-site, and fewer pages per session. All of these user behavior signals tell Google your site provides a poor experience, which directly hurts your rankings.
Choose a hosting provider that offers:
Fast server response times (under 200ms is ideal)
High uptime guarantees (in SiteGround’s case it’s 99.9%)
Content Delivery Network (CDN) integration
Automatic WordPress updates and security patches
Regular automated backups
Secure Your Site with HTTPS
Google officially stated that HTTPS has been a ranking signal since 2014. HTTPS (where the “S” stands for “secure”) means your site has an SSL certificate installed, which encrypts data between your server and visitors, protecting sensitive information.

Apart from the SEO point of view, an SSL certificate encrypts data between your server and visitors, protecting sensitive information. Browsers now flag HTTP sites as “not secure,” which damages trust and increases bounce rates.
Since SSL certificates need to be renewed regularly (typically every three months with providers like SiteGround using Let’s Encrypt), manual management can become a hassle—and a lapsed certificate means your site suddenly shows security warnings to visitors.
That’s why it’s essential to choose hosting that includes free SSL certificates with automatic installation and renewal, ensuring your site stays secure without any ongoing effort on your part.
For WordPress users looking for hosting that handles these technical details automatically, SiteGround offers WordPress-optimized hosting with built-in speed optimization, free SSL, automated updates, and daily backups.
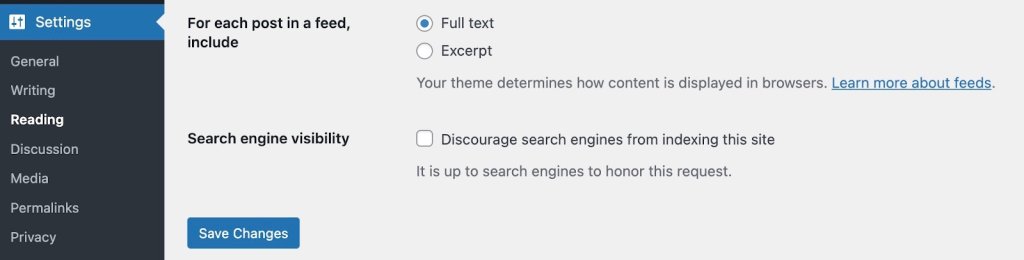
Check Search Engine Visibility
Even though it is obvious, it’s surprisingly common for sites to accidentally block search engines.
To check your search engine visibility in WordPress, go to Settings > Reading and verify that “Discourage search engines from indexing this site” is unchecked. If this box is checked, search engines won’t index your content, no matter how well-optimized it is.
Use SEO Plugins & Tools
WordPress doesn’t include built-in SEO features like meta descriptions, XML sitemaps, or schema markup. SEO plugins add these essential features directly to your dashboard.
All in One SEO (AIOSEO) is a popular WordPress plugin that handles automatic XML sitemap generation, meta tag optimization, schema markup, and local SEO tools—everything your WordPress site needs for technical SEO.
For advanced analysis beyond WordPress plugins, SEO PowerSuite is a desktop toolkit offering in-depth technical audits, backlink analysis, keyword research, and rank tracking. It works alongside your site to provide professional-level SEO insights.
Together, these give search engines what they need to properly crawl and index your site.
#2. Write Content That Demonstrates Expertise and Authority
Google now prioritizes content that demonstrates real expertise and experience over generic answers—if your WordPress content doesn’t show you actually understand your topic deeply, you’ll lose rankings to competitors who do, even if your technical SEO is perfect.
There’s an art to giving search engines (and, of course, your readers!) what they’re looking for. Let’s break down exactly what that looks like and how to do it effectively.
Understand and Match Search Intent
Before writing anything, ask yourself: “What do readers actually want to get out of the content they’re searching for?”
Understanding search intent is critical because Google prioritizes results that match what users are truly looking for, not just pages that contain the right keywords.
Search intent falls into four categories:
- Informational: Users want to learn something (“how to optimize images for SEO”)
- Navigational: Users are looking for a specific site or page (“WordPress login”)
- Commercial: Users are researching before buying (“best SEO plugins for WordPress”)
- Transactional: Users are ready to take action (“buy WordPress hosting”)
To understand the intent, simply perform a Google search with your target keyword and analyze the top results. What format dominates—guides, lists, comparisons, or product pages? What questions do they answer? What depth do they go into? Your content needs to match both the intent and the depth that’s already ranking.
Demonstrate Real Expertise and Experience
With AI-generated content flooding search results, Google has doubled down on rewarding content that demonstrates genuine notability, expertise, experience, authoritativeness, and trustworthiness (known as NE-E-A-T). This is where you separate yourself from generic content.
Google’s algorithms now actively look for signals of firsthand experience:
- Share specific personal examples from your own work, not generic advice anyone could write
- Include original data or statistics, case studies, or results you’ve personally achieved
- Add screenshots, photos, or videos showing your actual process
- Cite your credentials relevant to the topic—certifications, years of experience, client results
- Show your work: Explain the “why” behind your recommendations, not just the “what”
If you’re running a food blog, don’t just list ingredients—explain why you adjusted the recipe after testing it five times, what went wrong initially, and how you fixed it. That personal experience is impossible for AI to replicate and exactly what Google wants to surface.
Provide Depth That AI Overview Can’t Match
Google’s AI Overviews now answer simple questions directly in search results, which means surface-level content gets zero clicks. Your content needs to go deeper:
- Answer not just the main question, but the follow-up questions users have
- Explain nuances, exceptions, and common mistakes
- Provide context that requires real-world understanding
- Offer strategic thinking, not just tactical steps
For example, instead of just listing “10 SEO tips,” explain when each tip matters, why it works, what happens if you skip it, and how it fits into a broader strategy.
Structure Content for Both Humans and AI
Clear structure helps search engines understand your content and helps you optimize for AI Overviews and featured snippets:
- Use descriptive H2 and H3 headings that clearly indicate what each section covers
- Include question-based headings that match how people actually search (“Why Does Site Speed Matter for SEO?”)
- Use short paragraphs (2-3 sentences max) for better readability
- Add bullet points and numbered lists for scannable key takeaways
- Bold important concepts to help readers quickly identify crucial information
- Create a table of contents for longer content so users can jump to what they need
Organize Content with Categories for Topical Authority
Internal organization isn’t just for user experience—it’s a ranking factor. Proper categorization creates topical authority by showing search engines you have comprehensive coverage of a subject:
- Categories represent your main content pillars (e.g., “WordPress SEO,” “Content Marketing,” “Technical SEO”)
- Limit yourself to 5-10 main categories—too many dilutes your authority
- Each category should have at least 5-10 pieces of content to demonstrate depth
- Interlink related content within categories to show the relationships between topics

While WordPress also offers tags, these are primarily useful for internal site organization and filtering rather than SEO. Focus your energy on building strong category structures instead.
Build Topical Authority Over Time
Rather than writing randomly about whatever keyword you find, build authority in specific niches:
- Choose 3-5 core topics aligned with your expertise
- Create comprehensive pillar content covering each topic broadly
- Write supporting content that goes deep on subtopics, linking back to pillars
- Regularly update existing content as information changes or you gain new insights
- Interlink related content to show the relationships between topics
Search engines reward sites that demonstrate sustained expertise in specific areas rather than surface-level coverage of everything.
#3. Write Solid Meta Descriptions & URLs
Now that you’ve got your content in place, it’s time to give your on-page SEO a bit of polish. These elements help ensure that your pages are as appealing to search engines as they are to visitors.
Craft Compelling Title Tags
Your title tag is the clickable headline that appears in search results. It’s one of the most important on-page SEO elements because it tells both users and search engines what your page is about.
Keep them under 60 characters—longer titles get cut off in search results. Include your primary keyword near the beginning, and make them compelling enough to earn clicks. Add your brand name at the end, and make sure each title is unique across your site.
Example:
Bad: “Blog Post About Pizza”
Good: “Easy Homemade Pizza Recipe (Ready in 30 Minutes!)”
Most WordPress SEO plugins let you customize title tags separately from your page heading, giving you flexibility to optimize for search.
Write Meta Descriptions That Drive Clicks
Meta descriptions are the short snippets that appear under your page title in search results. They are your elevator pitch—you have just a moment to convince someone to click your result instead of scrolling past.
Aim for 150-160 characters—again, anything longer gets cut off in search results. Summarize the page content, include a call to action, use active voice, and slip in your primary keyword to keep things relevant and catch extra attention.
A good example of a meta description is: “Master homemade pizza in 30 minutes! Get easy tips for perfect dough, sauce, and toppings. Start now and wow your friends with your pizza skills!”

To make this easy, install an SEO plugin like AIOSEO. When editing a post, scroll to the SEO plugin’s section, fill in the “Meta Description” field, and preview how it looks in search results.
Create SEO-Friendly URLs
Clean, descriptive URLs help everyone understand what a page is about before clicking. They’re also easier to share and remember, and they help search engines understand your content—which is good for SEO.
Keep URLs short (under 60 characters when possible), include your primary keyword, use hyphens to separate words, and remove unnecessary stop words like “a,” “the,” “and,” or “of.”. For example: “yoursite.com/homemade-pizza-recipe/”.
When creating a post, click “Edit” next to the permalink below the title, simplify the URL slug, and click “OK.”

Note: Don’t change URLs on published pages without setting up redirects—you’ll break existing links and lose SEO value.
Optimize Your Images
Images make content engaging, but they need optimization to avoid slowing your site. Here’s how to make that happen:
Add descriptive alt text to every image—beyond SEO benefits, it’s essential for accessible web design and increasingly required by law under ADA and WCAG standards. Alt text helps visually impaired users understand your content through screen readers while also helping search engines index your images.
Use descriptive filenames before uploading, compress images to reduce file size, and enable lazy loading to keep your site accessible, compliant, and fast.
A bad example of an alt text is “image1,” while a good one is “homemade pizza with fresh mozzarella and basil on a wooden cutting board.”
To update an image’s alt text, simply click on an image in your post, find the “Alt text” field in the block settings sidebar, write your description, and save.
Speed Up Image Optimization
The SiteGround Speed Optimizer plugin handles image optimization automatically—compressing images, enabling lazy loading, and optimizing delivery without any manual work. You set it up once and forget about it—no manual compression or configuration needed.
#4. Link Like a Prо
Internal linking is one of the most underutilized WordPress SEO tactics. Strategic internal links distribute page authority throughout your site, help search engines discover content, and guide visitors to related information that keeps them engaged.
Why Internal Linking Matters for SEO
Internal links serve several critical functions: they distribute authority from high-ranking pages to others, help search bots discover and crawl new pages, establish which pages are most important, keep visitors engaged longer, and show search engines you have comprehensive coverage of topics.
Create Pillar Content and Topic Clusters
The most effective internal linking strategy revolves around pillar content and topic clusters.
Pillar content is a comprehensive guide on a broad topic—like this complete WordPress SEO guide. Cluster content consists of detailed posts on specific subtopics that link back to the pillar and to each other.
Example structure:
- Pillar: “The Complete WordPress SEO Guide” (this article)
- Clusters: “How to Submit Your Sitemap to Google Search Console,” “WordPress Page Speed Optimization,” “Local SEO for WordPress,” “Keyword Research for Blogs”
Each cluster article links back to the pillar, and the pillar links out to all relevant clusters. This creates a tight web of topically related content that search engines love.
How to implement:
- Identify 3-5 main topics your site will cover
- Create comprehensive pillar content for each (2,000-5,000 words)
- Write detailed cluster articles on subtopics (1,000-2,000 words each)
- Link cluster articles back to their pillar using descriptive anchor text (more on this below)
- Link from the pillar to all relevant cluster articles
- Interlink related cluster articles within the same topic
Use Descriptive Anchor Text
Anchor text—the clickable words in a link—tells search engines what the linked page is about. Use descriptive phrases that indicate what the linked page covers, include keywords naturally, vary your anchor text, and avoid generic phrases like “click here” or “read more.”
Bad examples: Bad: “For more information about pizza dough, click here.”
Good example: “Learn how to make perfect pizza dough from scratch.”
Find and Fix Orphaned Content
Orphaned content refers to pages with no internal links pointing to them. Search engines struggle to find these pages, and they miss out on authority benefits.
How to find orphaned content:
- Google Search Console: Go to Coverage or Pages, look for indexed pages with zero internal links
- SEO PowerSuite WebSite Auditor: Run a site audit, go to Site Structure > Pages, sort by “# of Incoming Internal Links”—pages with 0-1 links need attention
- Screaming Frog (free for up to 500 pages): Crawl your site, go to Internal > Unique Inlinks, filter for pages with 0-1 inlinks
Link to Important Pages More Often
Your most valuable pages—those that drive conversions or target important keywords—should receive more internal links. Identify your 10-15 most important pages and look for natural opportunities to link to them from blog posts and other content. Don’t force it—links should feel natural and valuable to readers.
Add Internal Links When Publishing New Content
Every time you publish new content, handle two tasks:
- Add links FROM the new post: Include 3-5 internal links to relevant existing content, especially pillar content if applicable
- Add links TO the new post: Identify 3-5 existing posts where the new content would be relevant and edit them to add contextual links back
This helps search engines discover new pages faster. Use your site’s search function to find posts mentioning related topics, review your categories for topically related content, or use plugins like Link Whisper that suggest relevant linking opportunities as you write.
Regularly check for:
- Pages with few or no internal links
- Broken internal links (404 errors)
- Orphaned content
Use Google Search Console to check for internal 404s, or install the Broken Link Checker WordPress plugin to automatically scan for broken links.
Internal Linking Checklist for Every Post:
Before publishing, make sure you’ve:
- Added 3-5 contextual internal links to related content
- Linked to your pillar content if relevant
- Used descriptive anchor text (no “click here”)
- Identified 3-5 existing posts to update with links to this new content
- Checked that all internal links work (no 404s)
- Varied your anchor text naturally
Strategic internal linking compounds over time. As you build more content and strengthen connections between pages, your entire site becomes more authoritative and easier for search engines to understand.
#5. Fine-Tune Technical SEO
Technical issues like broken links, slow load times, or missing sitemaps directly prevent Google from crawling and indexing your pages—fixing these backend problems can unlock rankings for content that’s already on your site but currently invisible to search engines.
Technical SEO might sound intimidating, but it’s really about making sure search engines can easily find, understand, and properly display your content. Running a technical SEO audit helps you identify these issues so you can fix them systematically. Think of it as organizing your site in a way that makes sense to both visitors and search engines.
Here are the essential technical elements every WordPress site needs.
Optimize Your Permalink (URL) Structure
Permalinks are simply the web addresses (URLs) for your posts and pages. The structure you choose affects every URL on your site. For example, a post titled “Best SEO Tips” could look like:
- yoursite.com/?p=123 (WordPress default—avoid this)
- * yoursite.com/best-seo-tips/ (recommended—clean and descriptive)
- * yoursite.com/2025/10/best-seo-tips/ (includes date—not ideal for evergreen content)
- * yoursite.com/seo/best-seo-tips/ (includes category—good but longer)
You should aim for clean and descriptive URLs, to help everyone understand what a page is about before clicking. They’re also easier to share and remember.
To set the permalinks (URL) structure up:
- Go to Settings > Permalinks in your WordPress dashboard
- Select Post name (this creates the cleanest URLs)
- Click Save Changes
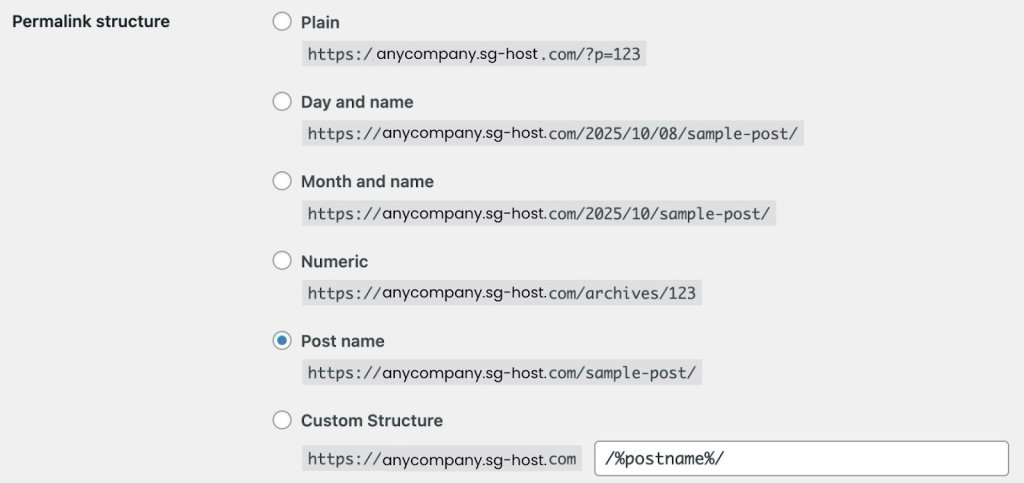
Important warning: Only change this setting on brand new sites. If your site is already published and ranking, changing permalinks will break all your existing links and damage your search rankings unless you’re prepared to set up technical redirects.
Set Up Your XML Sitemap
An XML sitemap is a file that helps search engines understand your website’s structure by listing its most important pages, making it easier for them to crawl and index your content. It’s like giving Google a map so it doesn’t miss anything.
The good news? Most WordPress SEO plugins create this automatically. Here’s what you need to do:
- Check your SEO plugin settings—your XML sitemap is usually created automatically at a URL like yoursite.com/sitemap.xml or yoursite.com/sitemap_index.xml (which organizes different content types into separate sitemaps)
- Look for options to exclude pages you don’t want indexed (like tags, author pages, or old archives)
- In Google Search Console, go to Sitemaps and submit your sitemap URL
Your sitemap should include your actual content—blog posts, important pages, and main category pages—while excluding administrative pages and thin content that doesn’t help visitors.
Add Schema Markup for Better Search Results
Schema markup is code that gives search engines extra context about your content. When implemented, it can make your search results stand out with star ratings, images, prices, FAQs, and other eye-catching elements that get more clicks.
Don’t worry—you don’t need to write code. Here’s the easiest way:
Using a Schema Plugin:
- Go to Plugins > Add New in your dashboard
- Search for a schema plugin like Schema Pro or Schema & Structured Data for WP
- Click Install Now, then Activate
- The plugin adds a new menu in your dashboard—click on it
- Choose what type of content you have (blog articles, products, local business info, recipes, etc.)
- Fill out simple forms with information like your business hours, author name, product prices, or recipe ingredients
- The plugin handles all the technical code automatically
Using Your Existing SEO Plugin:
Many WordPress SEO plugins already include schema features:
- When editing a post or page, scroll down to find your SEO plugin’s section
- Look for a tab labeled Schema or Structured Data
- Pick the type that matches your content from the dropdown menu
- Fill in the form fields
- Save your changes
How to Check If Structured Data is Working:
- Visit Google’s Rich Results Test tool or Schema Validator
- Enter your page URL in the search box
- Click “Test URL”
- Review the results—Google will show you what enhanced features you’re eligible for in search results and flag any errors that need fixing
Start simple: use the Article schema for blog posts and the LocalBusiness schema if you have a physical store or office. You can always add more types later.
Keep Your Database Clean
Your WordPress database is where everything gets stored—every edit you make, every comment, every setting. Over time, it collects unnecessary data that slows down your site. So think of this step like cleaning out a cluttered closet.
Here’s how to clean your WordPress database:
- Install a plugin called WP-Optimize or Advanced Database Cleaner (these do the work for you)
- The plugin will show you what’s safe to clean: old post drafts, spam comments, and expired temporary data
- Click to clean these items (the plugin won’t delete anything important)
- Set it to clean automatically once a week
Important: Before cleaning, make sure you have a recent backup of your site (most hosting providers do this automatically, but it’s worth checking).
Configure Your Robots.txt File
The robots.txt file is like a “do not enter” sign for search engines. It tells them which parts of your site to ignore so they can focus on your actual content instead of wasting time on crawling unnecessary files.
You can easily check your robots.txt file by adding “/robots.txt” at the end of your domain. Example – www.yourdomain.com/robots.txt
Most SEO plugins let you edit this easily:
- Find the robots.txt editor in your WordPress SEO plugin settings
- Copy and paste this basic setup (or your plugin might offer a template):
User-agent: *
Disallow: /wp-admin/
Disallow: /wp-includes/
Disallow: /wp-content/plugins/
Disallow: /wp-content/themes/
Allow: /wp-content/uploads/
Sitemap: https://yoursite.com/sitemap.xml
Here’s what each line does:
- Disallow lines tell search engines to ignore and not crawl specific paths—in this case, your WordPress admin area (/wp-admin/), core system files (/wp-includes/), plugins (/wp-content/plugins/), and theme files (/wp-content/themes/)
- Allow lines tell search engines these paths are okay to crawl—here, your images and media uploads (/wp-content/uploads/)
- Sitemap points search engines directly to your sitemap
This tells search engines: “Skip my WordPress system files since they’re not useful for search results, but definitely crawl my images and check my sitemap to find all my actual content.”
Prevent Duplicate Content Issues
WordPress automatically creates multiple versions of the same content—the same post might appear in your blog feed, in category pages, in tag pages, and in date archives. For example, a single blog post titled “10 SEO Tips” might be accessible at:
- Your main blog page: yoursite.com/blog/
- Its individual post URL: yoursite.com/10-seo-tips/
- A category page: yoursite.com/category/seo/
- A tag page: yoursite.com/tag/tips/
- A date archive: yoursite.com/2025/10/
- Author archive: yoursite.com/author/yourname/
Each of these URLs displays the same content, either in full or as an excerpt. When search engines find identical or very similar content at multiple URLs, they don’t know which version is the “real” one to show in Google search results.
This dilutes your ranking power—instead of all your SEO value going to one strong URL, it’s split across multiple weaker ones. Worse, search engines might choose the wrong version to rank, sending traffic to an archive page instead of your actual post.
A canonical tag is a piece of code in your page’s HTML that identifies the original version of your content. Canonical tags solve the duplicate content problem by pointing to the “main” version. Fortunately, most SEO plugins handle this automatically. To make sure it’s working:
- Check your SEO plugin settings to confirm canonical tags are turned on
- View any page on your site, right-click, and select “View Page Source”
- Look for a line that says <link rel=”canonical” near the top—if you see it, you’re all set
Manage Comments Without Slowing Down Your Site
Comments are great for engagement, but if you have hundreds on a single post, they can seriously slow down your page load time (which hurts SEO), and other users may try to promote their WordPress websites via the comment section on your website.
To optimize comments:
- Go to Settings > Discussion in your WordPress dashboard
- Check the box for “Break comments into pages” and set it to show 20-50 comments per page
- Enable “Comment must be manually approved” so you can filter out spam before it appears
- Require commenters to enter a name and email (reduces spam bots)
- Install Akismet or Antispam Bee—these plugins automatically protect your website from spam

If you have pages (like your About Us page or a Contact Us page) that don’t need comments, turn them off:
- Edit the page
- Look for Discussion settings in the right sidebar
- Uncheck “Allow comments”
Use NoFollow Links Appropriately
When you link to another website, you’re essentially giving them a small vote of confidence in Google’s eyes. The “nofollow” attribute tells Google, “I’m linking to this, but I’m not vouching for it.”
You should use nofollow for:
- Links in comments (WordPress does this automatically)
- Any links you’re paid to include (sponsored content or ads)
- Affiliate links where you earn commission
- Links to sites you don’t fully trust or haven’t verified
To add nofollow to a link:
- Highlight the text and create your link as usual
- Click the arrow next to the link to see more options
- Toggle on “Add nofollow”
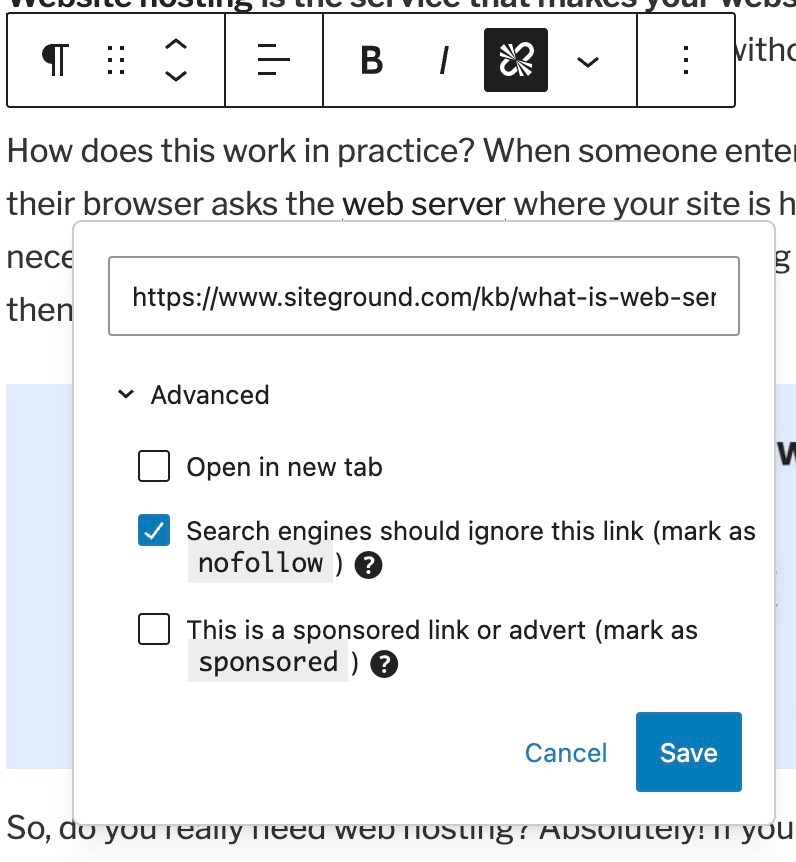
Most of your regular, editorial links to quality sources shouldn’t be nofollow—that’s normal, helpful linking that makes the web work.
Keep WordPress Updated
Running outdated WordPress software is like leaving your front door unlocked. Security vulnerabilities can get your site hacked or penalized by Google. One of the most important steps in securing your website is keeping WordPress, plugins, and themes updated.
Here’s your update checklist:
- WordPress automatically handles small security updates—make sure this is enabled in Dashboard > Updates
- Every few months, you’ll see a notification for bigger WordPress updates—click to update (most hosting providers make this one-click safe)
- Keep your plugins updated—go to Plugins and click Update for any that need it
- Delete plugins and themes you’re not using (don’t just deactivate them—actually delete them)
If you’re nervous about updates breaking something, ask your hosting provider if they offer a staging site where you can test updates before applying them to your live site.
SiteGround WordPress hosting includes staging environments, automatic updates, and one-click tools that make keeping your site secure simple.
Add Breadcrumbs for Easy Navigation
Breadcrumbs are the little navigation trails you see like: Home > Blog > SEO Tips > This Article. They help visitors understand where they are on your site and give them an easy way to navigate back.
Most SEO plugins include breadcrumbs:
- Go to your SEO plugin settings
- Find the Breadcrumbs section and enable them
- The plugin will provide simple instructions for adding them to your theme (usually just copying and pasting a small piece of code)
Breadcrumbs also show up in search results, making your listings more informative and clickable.
Fix Broken Links and Errors
Over time, links break—you delete old posts, external sites go down, or URLs change. These broken links frustrate visitors and waste the time search engines spend crawling your site.
To find and fix them:
- Sign up for Google Search Console (it’s free) and connect your site
- Check the Pages section regularly for “Not found” errors (404s)
- Install the Broken Link Checker plugin—it scans your site and alerts you to broken links
- For deleted posts that still get traffic, install the Redirection plugin to set up 301/302 redirects for visitors to relevant replacement content
Think of this as regular maintenance, like checking your car’s oil. A quick monthly review keeps everything running smoothly.
#6. Speed Up and Secure Your WordPress Site
Two factors can make or break your WordPress SEO: speed and security.
Sites that load in under 2.5 seconds rank significantly higher—Google measures this through Core Web Vitals scores that track loading performance, interactivity, and visual stability.
On the flip side, security vulnerabilities like malware or missing SSL certificates can get your site flagged, penalized, or completely removed from search results.
Let’s optimize both to keep your site ranking well and your visitors safe.
Optimize Your Site Speed
Page speed is a confirmed Google ranking factor, but it also impacts user behavior. Slow sites have higher bounce rates, lower engagement, and fewer conversions—all signals that tell Google your site provides a poor experience.
Compress and Optimize Images
Images are often the biggest factor slowing down WordPress sites. Large, uncompressed images can add seconds to your load time, directly hurting your rankings.
Start by compressing images without losing quality before you upload them. You can use free tools like TinyPNG, or better yet, automate the entire process with a plugin.
The SiteGround Speed Optimizer plugin handles this automatically—compressing images, enabling lazy loading, and optimizing delivery without any manual work. You set it up once and forget about it—no manual compression or configuration needed. It also optimizes CSS, JavaScript, and other elements that affect load times.
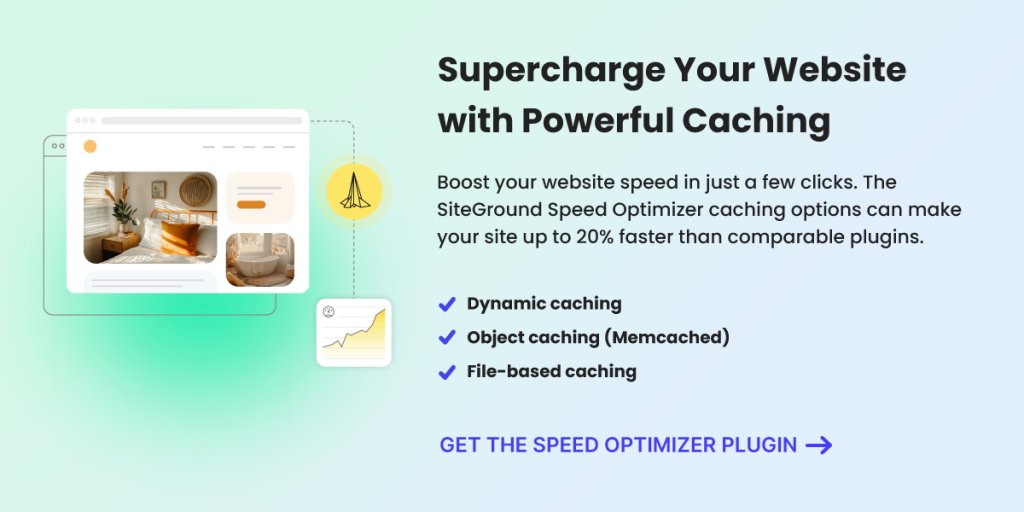
Use Caching
Caching stores a static version of your pages so WordPress doesn’t have to rebuild them from scratch for every visitor. This dramatically reduces server load and speeds up page delivery. The SiteGround SuperCacher automatically handles this, along with additional performance optimizations.
Every second you shave off your load time improves your Core Web Vitals scores and can move you up in rankings. Even small speed improvements make a measurable difference in both user experience and SEO performance.
Protect Your Site with Security Best Practices
WordPress security isn’t just about protecting your data—it’s a ranking factor. Google actively penalizes or removes sites with security issues because they don’t want to send users to potentially harmful pages. A hacked site can lose all its rankings overnight.
Why Security Matters for SEO
When your site is compromised, several things can happen that destroy your SEO:
- Google flags your site with security warnings, causing traffic to plummet
- Hackers inject spam links or malicious code that gets you penalized
- Your site could be completely removed from search results
- Even after cleaning up, it can take months to recover your rankings
Essential Security Practices
Protect your site with these fundamental security measures:
- Use strong, unique passwords for your WordPress admin, hosting account, and database
- Keep everything updated: WordPress core, plugins, and themes should always run the latest versions—outdated software is the #1 security vulnerability
- Delete unused plugins and themes entirely (don’t just deactivate them)
- Enable two-factor authentication for an extra layer of login protection
- Use security plugins to monitor for threats and vulnerabilities
The SiteGround Security Optimizer Plugin provides comprehensive protection specifically designed for WordPress sites. It monitors for threats, prevents common attacks, and alerts you to potential vulnerabilities before they become problems. A secure site maintains your search rankings, builds visitor trust, and protects the SEO work you’ve invested in.
#7. Keep an Eye on Progress
Now that your site is up and running, it’s important to track how it’s doing and make adjustments as needed.
SEO takes time, so set realistic expectations. It might take a few months to see results, but don’t get discouraged. Consistency and patience are key.
Use tools like Google Analytics and Google Search Console to monitor your site’s performance. Keep an eye on digital marketing metrics like traffic, bounce rates, and user behavior. For example, if you notice a high bounce rate on a particular page, it might indicate that the content isn’t engaging enough, prompting you to make improvements.
Get Your Free Digital Marketing Metrics Guide Struggling to interpret your marketing data? Use this guide to analyze your marketing performance and refine your strategy.
Google reCAPTCHA used. Privacy Policy and Terms of Service apply![]()
This data can help you understand what’s working and where you can improve. Keeping an eye on things regularly helps you stay on track and make smart choices.
WordPress SEO for Beginners: Next Steps
You’ve laid the groundwork for optimizing your WordPress site for SEO. From choosing the right hosting and securing SSL certificates to crafting content that aligns with what your audience is searching for, each step is crucial for enhancing your site’s visibility and performance in search engines.
Now it’s time to bring these strategies to life. Implement them one step at a time, and watch your WordPress site climb the search engine rankings.
Your journey to mastering WordPress SEO success is just beginning. Keep experimenting, learning, and adapting, and you’ll reap the rewards over time.
Happy optimizing!


Comments ( 0 )
Thanks! Your comment will be held for moderation and will be shortly published, if it is related to this blog article. Comments for support inquiries or issues will not be published, if you have such please report it through our official channels of communication.
Leave a comment
Thanks! Your comment will be held for moderation and will be shortly published, if it is related to this blog article. Comments for support inquiries or issues will not be published, if you have such please report it through our official channels of communication.