How to Host a Website: The Only 6 Steps You Actually Need + Quiz

Website hosting is like the plumbing of your online business; when it works, you don’t even notice it, but when it doesn’t, it’s a major headache.
That’s why we’re here with a guide on how to host a website, breaking it down into simple, no-nonsense steps. Plus, there’s a self-assessment quiz here to help you figure out exactly what you need from your web hosting, so you can make the best choices for your business.
Whether you’re launching your first website or expanding your digital footprint, we’ve got you covered.
So get ready to unlock your business’s full potential with our easy-to-follow guide to web hosting success!
What is Website Hosting and Why Do You Need It?
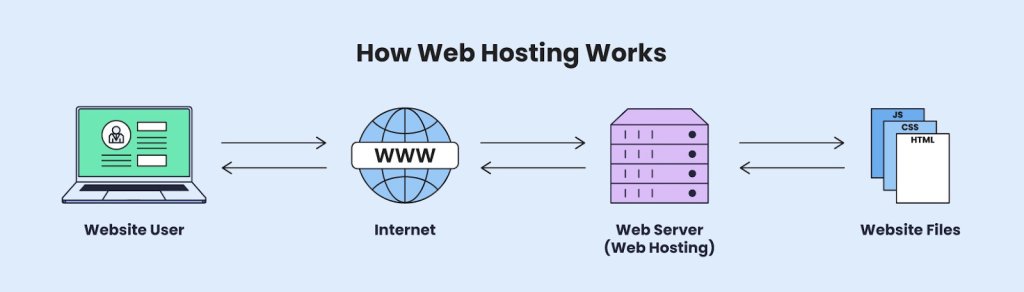
Website hosting is the service that makes your website accessible on the internet. Without hosting services, your site is like a book without a shelf—no one can find it.
How does this work in practice? When someone enters your website’s URL or clicks a link, their browser asks the web server where your site is hosted in order to send over the necessary files. The server quickly responds, sending the files back to the browser, which then turns them into the web page your visitor sees.
So, do you really need web hosting? Absolutely! If you want people to visit your site, hosting is a must.
But what is the cost of hosting a website? Hosting prices can vary quite a bit, depending on things like how much storage and bandwidth you need. No need to worry, though, there are hosting options for every budget, and we’ll explore the costs by type of hosting in this article, so you can find something that fits just right.
How To Host a Website in 6 Steps
You now know what web hosting is, so roll up your sleeves and let’s get started. Learning how to host a website might seem tricky, but we’ve laid it out in six simple steps to get you up and running quickly.
Each step is a building block for your online presence, helping you create a website that engages visitors and enhances your brand’s credibility.
Step 1: Decide on Your Hosting Needs
Before you kick off your web hosting adventure, it’s essential to educate and prepare yourself by understanding the goals and needs for your website. This is where website planning comes into play.
Consider how your website fits into your broader marketing funnel. Are you looking to attract new customers, engage existing ones, or perhaps show off your work? Defining your goals will help shape your hosting decisions.
| Quick quiz: Self-assess your hosting needs |
| What type of website are you building? A. Personal blog or hobby site B. Small business or portfolio site C. Ecommerce store D. Large-scale corporate or media site |
| How much traffic do you expect? A. Fewer than 1,000 visitors per month B. Between 1,000 and 10,000 visitors per month C. Between 10,000 and 100,000 visitors per month D. More than 100,000 visitors per month |
| What’s your monthly budget for hosting services? A. $0-10 (Looking for the most budget-friendly option) B. $10-50 (Willing to invest for moderate features) C. $50-100 (Prepared to pay for advanced features and performance) D. $100+ (Seeking top-tier resources and support) |
| How comfortable are you with the technical setup? A. Not comfortable at all (Prefer a fully managed service) B. Somewhat comfortable (Can handle basic tasks with guidance) C. Comfortable (Able to manage most tasks with some support) D. Very comfortable (Experienced and can handle complex tasks independently) |
- If you mostly selected A’s, a basic shared hosting plan could be perfect for your needs, offering affordability and ease of use.
- If your responses lean towards B’s, consider a managed hosting plan or cloud hosting that provides more resources and support for growing websites.
- For those who chose C’s, a dedicated server or an advanced cloud hosting might be ideal, providing enhanced performance and control.
- Lastly, if you found yourself selecting D’s, a high-end dedicated server hosting would suit your complex needs and high web traffic demands.
Your Free Website Planning Checklist Build with clarity, launch with confidence
Google reCAPTCHA used. Privacy Policy and Terms of Service apply![]()
Step 2: Choose a Reliable Web Hosting Provider
Once you’ve figured out what you need, it’s time to choose a hosting provider—basically, the company that will give your site a home on the internet.
Choosing the right provider is super important for your site’s success. You’ll want to look for a few key things like uptime, support, speed, and scalability. Here’s how each one of them plays out in reality:
- Uptime: This is like having a reliable power supply for your own website. You want your site to be up and running all the time. SiteGround offers 99.9% uptime, so your site won’t be “down” or unavailable.
- Customer Support: Whether you’re into tech or not, having a friendly expert on speed dial is invaluable. You’ll want a hosting provider with a broad scope of support, offering help around the clock. This way, if something goes wrong, you can get assistance anytime, day or night.
- Site Speed: You’ve seen the stats on modern attention spans—people want things fast. A fast site means happy visitors and it can even help your site show up higher in search results. Plus, site speed directly impacts conversions; with every passing second it takes your page to load, conversions drop. So, choose a provider that keeps things zippy. So, choose a provider that keeps things zippy.
- Scalability: As your website grows, you’ll need more resources. A good hosting provider will make it easy for your hosting to grow along with your site’s needs.
Hosting Multiple Websites
Managing multiple websites can be a great way to grow your online presence or juggle different projects all in one place. Whether you’re a web agency, a business with several brands, or just someone with a bunch of interests, having the right hosting setup is crucial to keep things running smoothly.
For example, SiteGround’s client PixWeb, a web agency, effectively uses our hosting to manage up to 40 websites on a single server, leveraging its scalability to bundle hosting with maintenance for consistent revenue. With built-in tools like daily backups and performance optimizers, SiteGround simplifies website management, underscoring its reliability and support as essential for business growth.
Hosting multiple websites can be a fantastic way to expand your online presence or manage various projects under one roof.
To make sure you make the best choice, read customer reviews on trusted tech sites, check provider websites for uptime and support details, and test their customer support responsiveness.
Step 3: Select the Right Hosting Plan
Now that you’ve decided on your provider, your next task is to choose the right hosting plan. You need something that meets your current needs but also has the flexibility to grow with you. Start small and look for web hosting plans that offer scalability options. Many web hosting providers offer money-back guarantees, so you can try before you buy and see what feels right for you.
Next, let’s break down the different hosting types and weigh their pros and cons. This will help you quickly pinpoint which option aligns best with your website’s needs and future website hosting plans.
Shared Hosting
Pros: Shared hosting is affordable and easy to set up, making it suitable for beginners.
Cons: It has limited resources and the potential for slower website performance due to shared resources.
Cost: Typically ranges from $3 to $10 per month, making it the most budget-friendly option.
VPS Hosting
Pros: With VPS hosting, you gain greater control, scalable resources, and enhanced performance.
Cons: It demands some technical know-how and is costlier than shared hosting services.
Cost: Generally costs between $20 to $100 per month, depending on the resources and features.
Cloud Hosting
Pros: Cloud hosting excels in scalability, reliability, and performance, and it’s cost-effective with pay-as-you-go pricing.
Cons: Managing it can be complex, plus costs can vary.
Cost: Prices vary widely, often starting around $10 per month and increasing based on usage and resources.
Dedicated Hosting
Pros: This option provides a dedicated server with dedicated resources, exceptional performance, and extensive customization options.
Cons: It’s expensive and requires a high level of technical expertise to manage effectively.
Cost: Typically ranges from $80 to $300+ per month, depending on the server specifications and additional services.
Managed WordPress Hosting
Pros: Managed WordPress hosting takes care of server maintenance, updates, and security, making it perfect for those with limited technical skills.
Cons: It tends to be more expensive than unmanaged options and offers less control over server configurations. When deciding between managed and unmanaged hosting, consider whether you prefer convenience and support or greater control and customization.
Step 4: Register Your Domain Name
Your domain name is your website’s unique address on the internet, like “yourwebsite.com.” A custom domain makes your brand look professional, is easy to remember, and can help your website rank higher in search results. With free website addresses that include the hosting company’s name—like ‘yourname.siteground.com’—your site can seem less trustworthy and harder for people to find.
You can easily do this by going to SiteGround. Plus we have an AI domain name generator tool that can help you come up with a name.

Tips for choosing a domain name:
SEO-friendly names: With or without the help of AI, secure a domain name that reflects your website’s purpose and, if possible, includes relevant keywords. This can help improve your search engine rankings.
Consider privacy add-ons: SiteGround offers domain privacy protection to keep your personal information private from public databases, enhancing your website’s security.
With your domain registered, you’re one step closer to establishing your online presence and building a recognizable brand.
Step 5: Create Your Website
Now comes the fun part—creating your website! There are several paths you can take here, depending on your comfort level and needs.
You might consider using a standard CMS platform like WordPress. While WordPress offers a wide range of themes and plugins to customize your site, its interface can sometimes feel a bit overwhelming with a steep learning curve, especially for beginners. However, opting for managed WordPress hosting can solve this problem by handling updates and maintenance.
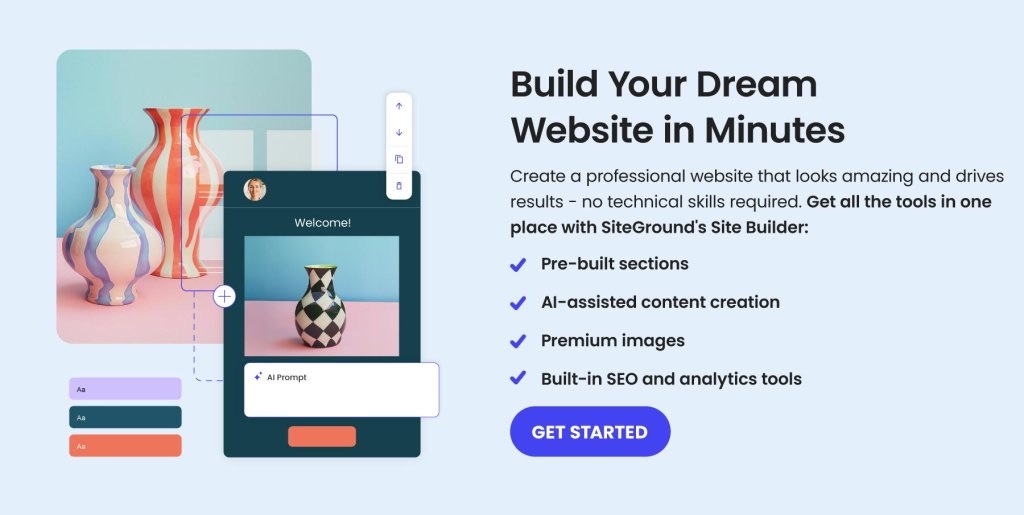
Alternatively, you can use tools like the SiteGround Website Builder, which makes things as easy as it gets. The difference here is that the Website Builder is designed for simplicity, offering drag-and-drop features and pre-made templates that are fully integrated, so you can get up and running quickly without any technical & coding knowledge.
Step 6: Upload, Test, and Launch Your Website
If you’ve built your site locally, once your website is ready, you’ll need to upload your files to get everything set for the big launch. Put your website files in the public_html folder, which is where your main domain’s files should go. If you have additional sites, like subdomains, make sure to upload their files into their own specific folders.
Besides your website files, most modern sites also use databases to handle dynamic content. Make sure you upload your database and set it up correctly on your server.
Managing FTP (File Transfer Protocol) accounts is essential for transferring your website files to your server efficiently. FTP allows you to upload, download, and manage files on your server directly from your computer. To manage your FTP accounts, navigate to Site Tools > Site > FTP Accounts.
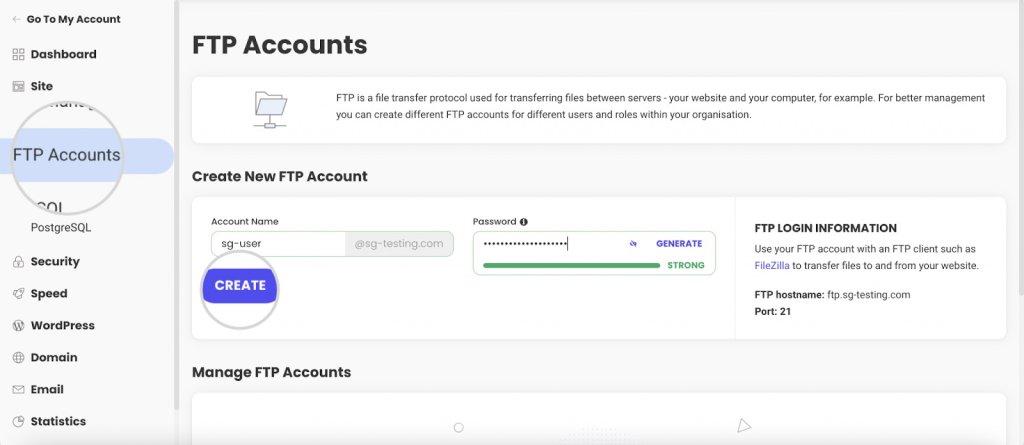
Here, you can set up new FTP accounts or manage the ones you already have. For existing accounts, you can check your credentials and update the name, username, password, account quota, or directory. This control helps you easily upload and organize your website files.
Before going live, check your website for errors, mobile responsiveness, and speed. These factors are vital for a good user experience and can significantly impact your site’s success.
Launch tips:
SSL Setup: Secure your site with an SSL certificate. SiteGround automatically provides a free SSL certificate for your domains, making this step hassle-free.
SEO Basics: Submit your sitemap to search engines to enhance your site’s visibility. Crafting meta descriptions and maintaining a clear SEO hierarchy are also crucial for optimizing your site. For instance, the SiteGround Website Builder offers built-in SEO functionality that guides you through essential steps to effectively optimize your site.
If all of this sounds too techy, here’s the summary. To launch your site, upload your files using FTP, check that everything works smoothly, secure it with SSL, and make sure search engines can find it.
If you’re using SiteGround’s managed WordPress hosting, you can skip these upload steps because WordPress is automatically installed, making things a lot easier.
If you’re looking for an even easier option, give the SiteGround Website Builder a try. It simplifies the process with drag-and-drop tools and pre-designed templates. And if you run into any issues, expert support is just a click or call away to help guide you through the process.
Your Next Steps in Website Hosting
And tada! You’ve learned how to host a website, and now it’s ready for users to jump in and explore. You’ve come a long way, and it’s time to recap the journey.
Your 6 steps to host a website:
Understand your needs
Choose a web hosting provider
Select the right hosting plan
Register your domain name
Create your website
And finally, upload, test, and launch your site.
Knowing how to host a website is essential for making your website accessible on the internet, providing the infrastructure and support your site needs to thrive.
Ready to take the plunge? Give SiteGround hosting a try. We cover all the bases we’ve discussed and offer user-friendly Site Tools to make managing your website a breeze. Plus, with the SiteGround Website Builder you will get a seamless integration of SSL and SEO functionality to improve your site’s performance and security.
Whether you’re just starting out or looking to grow, SiteGround provides the tools and reliability to support your online journey.


Comments ( 0 )
Thanks! Your comment will be held for moderation and will be shortly published, if it is related to this blog article. Comments for support inquiries or issues will not be published, if you have such please report it through our official channels of communication.
Leave a comment
Thanks! Your comment will be held for moderation and will be shortly published, if it is related to this blog article. Comments for support inquiries or issues will not be published, if you have such please report it through our official channels of communication.